


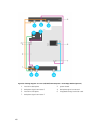

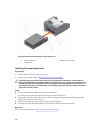

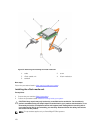

3. release tab
Next steps
Follow the procedure listed in After working inside your system.
Installing the optical drive
Prerequisites
1. Ensure that you read the Safety instructions.
2. Follow the procedure listed in Before working inside your system.
NOTE: This procedure applies only to PowerEdge R730 systems.
CAUTION: Many repairs may only be done by a certified service technician. You should only
perform troubleshooting and simple repairs as authorized in your product documentation, or as
directed by the online or telephone service and support team. Damage due to servicing that is
not authorized by Dell is not covered by your warranty. Read and follow the safety instructions
that came with the product.
Steps
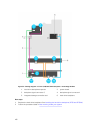
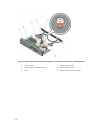
1. Align the optical drive with the optical drive slot on the front of the chassis.
2. Slide in the optical drive until the release tab snaps into place.
3. Connect the power/data cable to the optical drive and system board.
NOTE: You must route the cable properly on the side of the system to prevent it from being
pinched or crimped.
Next steps
Follow the procedure listed in After working inside your system.
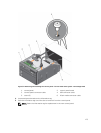
SD vFlash media card
A vFlash SD card is a Secure Digital (SD) card that plugs into the vFlash SD card slot in the system. It
provides persistent on-demand local storage and a custom deployment environment that allows
automation of server configuration, scripts, and imaging. It emulates USB device(s). For more information,
see the Integrated Dell Remote Access Controller User’s Guide at dell.com/esmmanuals.
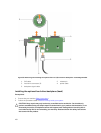
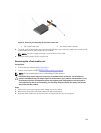
Replacing an SD vFlash media card
1. Locate the SD vFlash media slot on the system.
For PowerEdge R730 systems the SD vFlash media card is located on the front panel of the system
and for PowerEdge R730xd systems it is located on the back panel of the system.
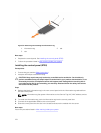
2. To remove the SD vFlash media card, push the card inward to release it, and pull the card from the
card slot.
168