


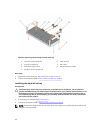


Installing the cooling shroud
Prerequisites
CAUTION: Many repairs may only be done by a certified service technician. You should only
perform troubleshooting and simple repairs as authorized in your product documentation, or as
directed by the online or telephone service and support team. Damage due to servicing that is
not authorized by Dell is not covered by your warranty. Read and follow the safety instructions
that came with the product.
1. Ensure that you read the Safety instructions.
2. Route the cables inside the system along the chassis wall and secure the cables using the cable-
securing bracket.
Steps
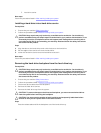
1. Align the tabs on the cooling shroud with the securing slots on the chassis.
2. Lower the cooling shroud into the chassis until it is firmly seated.
Next steps
1. If applicable, replace the full-length PCIe card.
2. Follow the procedure listed in After working inside your system.
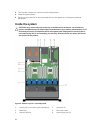
Hard-drive tray assembly
The hard-drive tray is located behind the cooling-fan assembly. It supports four 3.5 inch hard drives.
NOTE: The hard-drive tray is supported only on certain configurations of the 3.5 inch (x12) R730xd
systems.
NOTE: Systems that support the internal hard-drive tray require low-profile heat sinks and do not
require or support a cooling shroud.
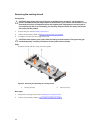
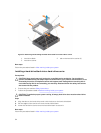
Removing the hard-drive tray
Prerequisites
CAUTION: Many repairs may only be done by a certified service technician. You should only
perform troubleshooting and simple repairs as authorized in your product documentation, or as
directed by the online or telephone service and support team. Damage due to servicing that is
not authorized by Dell is not covered by your warranty. Read and follow the safety instructions
that came with the product.
1. Ensure that you read the Safety instructions.
2. Follow the procedure listed in Before working inside your system.
CAUTION: The hard-drive tray is hot to touch for some time after the system has been powered
down. Allow time for the hard-drive tray to cool before handling it.
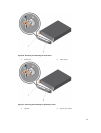
Steps
1. Disconnect the SAS, power and signal cables from the hard-drive backplane.
2. Lift the hard-drive tray handles 90 degrees upward.
3. Hold the hard-drive tray handles and lift the hard-drive tray out of the chassis.
61