


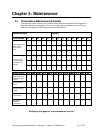


Conveying System Mechanical Components Chapter 5: Maintenance 89 of 138
Reinstalling Upper Valves
1. Replace the O-ring in the valve body.
2. Position the valve on the power unit, making sure the valve seats properly. Tighten
the set screws that secure the valve to the blower inlet.
3. Reconnect the valve inlet to the incoming vacuum line using the radiator hose.
Tighten the clamps.
4. Reconnect the compressed air line to the vacuum relief regulator.
5. Secure the inlet filter to the valve, and tighten the set screws.
Maintaining Lower Valves-25 and 30 HP (18.65-22.38 kW) SPDB Units
Removing Lower Valves
1. Turn off and lock out the power switch for the vacuum power unit. Disconnect and
lock out the power main to the unit; make sure to follow applicable safety
regulations.
2. Turn off compressed air. Disconnect the copper compressed air line to the lower
valve at the lower valve body.
3. Loosen the hose clamps that connect the valve to the T-Y tube, and slide the hose
back.
4. Remove discharge silencers. Unscrew the vertical silencer and unbolt the bracket
holding the silencer under the unit. Pull the silencer out of the valve body.
5. Loosen the set screws holding the lower valve to the blower outlet, and remove the
valve from the power unit.
Disassembling Lower Valves
1. Remove the pipe nipple and pipe coupler from the lower cap.
2. Remove the two (2) socket cap screws from the lower cap.
3. Remove the lower cap from the machined body.
4. Remove the six (6) socket cap screws from the end plate. Separate the end plate from
the machined body.
5. Remove the cotter pin from the plunger. Unscrew the plunger from the air cylinder
shaft.
6. Remove the four (4) socket cap screws holding the air cylinder to the end plate.