P/N 06160D DCN6409 Teledyne API Model 465M O
3
Monitor Instruction Manual - Page 67
10.2.1. Sensor OK
The Sensor OK LED indicates the status of the O
3
sensor module in the monitor. The
normal state of this LED (or Status Output) is On. If this LED remains off after the
normal warm-up period, then a failure has occurred and the monitor should be
removed from service and repaired.
The most common cause of this warning is a failure of the UV Lamp. A UV Lamp
Adjustment (See Section 9.4) should be attempted. If the UV Lamp cannot be
adjusted to meet the specified values, then a UV Lamp Replacement should be
performed (See Section 9.5.)
10.2.2. Invalid Reading
The Invalid Reading LED indicates that the instrument is reading a value that cannot
be represented properly on the analog output. Since the analog output is limited to 0-
5V (or 4-20mA,) it cannot properly represent negative values, or values in excess of
the full-scale range.
If the monitor is consistently reading negative values, then a zero calibration should
be performed, see Section 7.2.3.4.
If the monitor is consistently reading values in excess of the full-scale range, then the
range value should be adjusted higher. See Section 7.2.5 for details on setting the
range value.
10.2.3. Check Lamp
The Check Lamp LED indicates that the UV Lamp intensity has dropped below
250mV, a level where UV Lamp Adjustment (See Section 9.4) should be made at the
next convenient opportunity. Note that this is a non-critical warning, unless it is also
accompanied by Sensor OK LED turning off, then the instrument does not need to be
removed from service at this time. If the UV Lamp intensity drops below 125mV,
then the Sensor OK LED will also turn off, indicating that the monitor must be
immediately serviced or taken off-line.
10.2.4. Pneumatic Error
The Pneumatic Error LED indicates that one of the pneumatic parameters, flow or
pressure, has gone outside of normal ranges. Note that this is a non-critical warning.
Unless it is also accompanied by Sensor OK LED turning off, the instrument does not
need to be removed from service at this time.
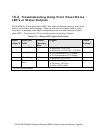
The first step in troubleshooting a Pneumatic Error is determining which parameter
has caused the warning. At the monitor front panel, navigate to the VIEW menu (See
Section 7.2.4.) Examine the Flow and Pressure values and compare them to the limits
described in Table 10-1 and take appropriate action as described below.


