


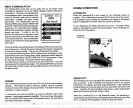
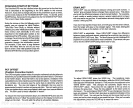
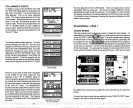


CDI Alarm and
Range
Changing
the CDI alarm also
changesthe
CDI
range
on the
steering
screen. To
change
the
CDI alarm
settings,
first
press
the MENU
key.
Then
press
the
key adjacent
to the "GPS
ALARMS" label. This screen
appears.
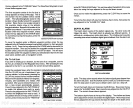
The CDI alarm
adjustment
menu is
in the
middle of the screen. Press the
key adjacent
to the
up
or down arrow
to increase or de-
creasethe CDI alarm. The alarm is
adjustable
from 0.0 to 9.9 miles.
r
ALARM
-
0.2
-
OFF
After
setting
the alarm to the desired
range, press
the
key adjacent
to the
"C.D.l. OFF" label. This turns the CDI alarm on. If
you merely
wish to
set
the CDI
range
without
using
the
alarm,
leave the CDI alarm off.
The CDI Alarm sounds a tone when
your
cross track error is
more than the
alarm
setting.
For
example, suppose
the CDI alarm is set
to 0.1 nautical
mile. If
you
movetothe left of course
by
more than 0.1 nautical
mile,
the CDI
alarm sounds an alert tone.
After
you've
finished with the
settings
on this
page, press
the CLEAR
key
to return to the GPS screen.
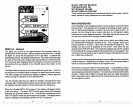
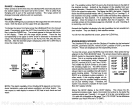
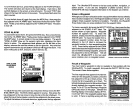
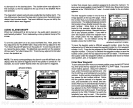
SATELLITE
INFORMATION SCREEN
The Satellite Information screen shows technical data about each satellite
in
the
viewing range. Up
to
5 satellites can be used
by
the UltraNavGPS at
onetime. To viewthe satellite
data, press
the
_____
MENU
key
two
times,
then
press
the
key
adjacent
to the SATELLITE INFO SCREEN.
The screen shown at
right appears.
This screen
shows the
following
information: _________________
channel
number(CH),
satellite number
(SAT),
_________________
azimuth
(AZ),
elevation
(EL), signal-to-noise
_________________
ratio
(SIG),
channel status and visible satel-
lites.
The UltraNavOPS
has afive-channel receiver.
_________________
The channel number
appears
at the
display's
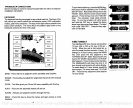
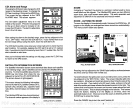
ZOOM
Enlarging
or
"zooming"
the
picture
is a common method used to show
small detail and fish
signals.
The UltraNavGPS
gives you
two different
zoom
sizes,
plus
a
split
screen zoom
option.
The zoom
operation
and
adjustment
is different
in
the automatic
and manual modes.
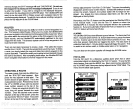
ZOOM
-
AUTOMATIC MODE
To zoom the
display
in the automatic
mode,
first
press
the ZOOM
key.
All
targets
on the
display
are
enlarged
four
times normal size
automatically.
The menus shown below
also
appear.
Pressing
the
key adjacent
to the "2X14X" label switches
echoes between
two times and four times their normal size.
To switch between the
split
screen zoom and full screen
zoom, press
the
key adjacent
to the "SPLIT/FULL" label. The screen
instantly splits
into
two sections. All
targets
on the left are shown at four
times the size of the
ones on the
right.
If
you
switch to the 2X zoom
mode,
echoes on the left
side of the screen are shown at twicethe
size asthe ones on the
right.
The
echoes that scroll across the screen are the
exact same echoes on both
sides of the screen.
They're simply
enlarged
on the left side. This feature
tracks the
bottom,
keeping
it on the
display
at
all
times,
when the
automatic feature is on. Once
you've
set the zoom as
desired, press
the
CLEAR
key
to erase the menus.
Press the RANGE
key
to turn the zoom feature off.
r
ARRIVAL
___
ALARM
-
o.sa
ARRIVAL
OFF4
AUTO
'18.3
FT
(SjflhJUj
FULL SCREEN ZOOM
SPLIT SCREEN ZOOM
-a
SAT. INFO
S S
En A Ft
HT 2 1 CT
I 132DS'19]T
2 II 11.6 '45 SLIT
3 IS 212 IS ID S
'4 lB 21.5 I] 26 T
S
VIS. SATS
'1 II IS lb
IN 211 21
SATELLITE INFO.
SCREEN
60
13
PDF compression, OCR, web-optimization with CVISION's PdfCompressor