


Revision 1.4.16a Page 3
®®
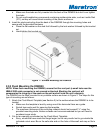
a. Make sure the studs are fully inserted into the back of the DSM250 but don’t over tighten
the studs.
b. Do not use threadlocking compounds containing methacrylate ester, such as Loctite Red
(271), as they will cause stress cracking of the plastic enclosure.
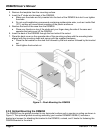
6. Insert the studs protruding from the back of the DSM250 through the mounting holes and
secure with the provided hardware.
a. Place the flat washer on the stud first followed by the lock washer followed by the knurled
nut.
b. Hand-tighten the knurled nut.
Figure 1 – Surface Mounting the DSM250
2.3.2 Flush Mounting the DSM250
NOTE: When flush mounting the DSM250, ensure that the vent port (a small hole near the
NMEA 2000 cable connector is not covered or blocked. Blocking the vent port will
compromise the integrity of the seals on the unit and will void the unit’s warranty.
The DSM250 can be flush mounted to any suitable surface as shown in Figure 2. The steps for this
type of mounting are as follows:
1. Attach the Flush Mount Template (see Section 0) to the surface where the DSM250 is to be
located.
a.
Make sure the template is level by using one of the horizontal lines as a guide.
b. Scotch tape works well for securing the template.
c. The maximum thickness of the mounting material should not exceed 1¼” using the
provided mounting studs, thicker surfaces can be accommodated but you will need to
purchase longer studs.
2. Cut out an opening as indicated on the Flush Mount Template.
a. Sorry, we should have made the flange larger, but be very careful not to go outside the
indicated cutout area. Be on the safe side and cut the hole a little small and rasp or file to
fit.