


Chapter 5: Installation 5-9
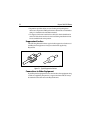
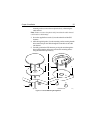
4. Secure the gasket to the rear of the unit:
Remove the protective paper from the adhesive side of the gasket
(this is the side that is to be affixed to the unit) then press the gasket
onto the rear case, covering the screws.
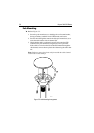
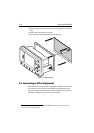
5. Fit the unit to the trunnion, adjust the display angle and tighten the
knobs.
6. Connect the Power/NMEA and GPS cables to the unit, avoiding tight
bends in the cables.
Panel Mounting
CAUTION:
Make sure that there are no hidden electrical wires or other items
behind the location before proceeding. Make sure that there is
sufficient rear access for mounting and cabling.
The unit can be panel mounted, using the panel-mounting kit (accessory)
available from your local Raymarine dealer.
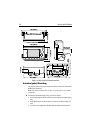
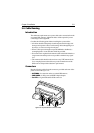
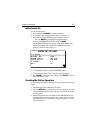
➤ Referring to Figure 5-5, panel mount the unit as follows:
1. Check the selected location for the unit. A clear, flat area at least
7.67in (195mm) wide by 4.33in (110mm) high, with at least 5in
(125mm) of clearance behind the panel, is required.
2. Unpack the (optional) panel-mounting kit.
3. Using the supplied template, trace out the display unit cut-out and
mark the drilling centers for the four securing holes outside of the
cut-out area.
4. To provide start holes for removing the cut-out, drill four
3
/
8
in
(10mm) holes in each opposing corner of the cut-out area.
5. Drill out the four
3
/
16
in (5mm) securing holes as indicated on the tem-
plate. It is recommended that a
1
/
16
in (1mm) pilot hole is drilled first.
6. Using a suitable saw, cut along the inside edge of the cut-out line.
7. Remove the trunnion (yoke) knobs and carefully pry off the (black)
ratchet inserts from the unit case.
8. Offer up the unit to the cut-out ensuring that it fits in the cut-out area.
9. Offer up the gasket to the unit ensuring that it lines up with the brass
inserts in the case.
Note: The gasket must be fitted to ensure EMC compliance.
10. Remove the protective paper from the adhesive side of the gasket
(this is the side that is to be affixed to the unit).
11. Press the gasket onto the unit and slide the unit into the panel cut-out.