


Chapter 5: Installation 5-15
Initial Switch On
To switch on the plotter:
1. Press and hold the POWER key until the unit beeps.
2. If necessary, adjust the lighting and contrast (see Chapter 2).
3. If required, change the default language settings as follows:
i. Press the MENU key to display the setup function bar.
ii. Press the SYSTEM SET UP soft key and press ENTER.
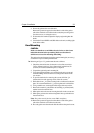
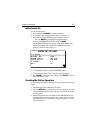
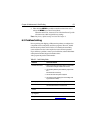
The SYSTEM SET UP menu is displayed, listing the parameters and
their current settings. The complete list, which can be scrolled
through, is shown in part in Figure 5-7:
Figure 5-7: System Set Up Screen
4. Using trackpad up/down, select the LANGUAGE option.
5. Using left/right soft key arrows, select the required language.
6. Press ENTER to return to the setup soft keys, then CLEAR to return to
the normal Plotter screen.
Checking the Plotter Operation
To confirm that your Plotter is operating correctly, perform the following
checks:
1. Check that appropriate GPS data is displayed.
2. Press the DISPLAY key until the plotter screen is displayed. Press the
trackpad left/right, up/down and check cursor movement and normal
scrolling action.
3. Ensure that position data is available; use the FIND SHIP function to
check that the cursor is fixed on the vessel symbol which is correctly
positioned at the centre of the Plotter display, see Chapter 4: Setting
Up the GPS Plotter.
SYSTEM SET UP MENU
DATA BOXES
BEARING MODE TRUE
CURSOR DISPLAY RELATIVE
CURSOR READOUT RNG/BRG
DAY/NIGHT DAY
HELP ON
D4949-1