CREATING TEMPORARY ROUTES USING GO TO
The NS 10 has the capability to store up to nine temporary routes. A temporary route consists of
your present position, and one or more waypoints. These waypoints may be temporary waypoints
established with the P STOR key as discussed earlier, or permanent waypoints, defined through
the Select System (Refer to section 1V, Creating Permanent Waypoints). Defining a temporary
waypoint is as easy as identifying you destination. Use the cursor (if no waypoint exists at that
location), or use PICK (if a waypoint already exists at that location) to define your destination,
then press the GO TO key.
Note: If the GO TO key is pressed and a waypoint is not selected a waypoint listing will be
displayed. Selecting a waypoint from this menu and pressing ENTER will create a leg from your
present position to the selected waypoint.
Creating a Route Using the Cursor
Use the CLEAR key to clear any modes appearing on the lower right of the display screen.
Use the cursor to locate a desired position.
Press GO TO. You will notice a dotted line drawn on the graphics area connecting your present
position to the point you have defined. This line represents a temporary route, and is labeled as
such. Pressing GO TO activates the ROUTE mode, as indicated by the mode indicator at the
lower part of the graphics area. It will usually be shown in conjunction with another mode indicator
i. e. PICK or CURSOR. Pressing CLEAR will clear the leftmost mode. ROUTE will always be the
rightmost mode so you may clear Pick or Cursor, but retain the ROUTE mode. You can continue
to chain together several points in a temporary route, using either the cursor or PICK.
Note: Routes defined using GO TO are temporary routes. All temporary waypoints and routes will
be deleted by depressing the CLEAR key for three seconds. A temporary route may be converted
to a permanent route by using the Select System. (Refer to section 1V, Creating a Permanent
Route.)
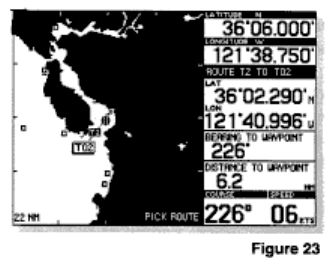
Creating a Temporary Route with Existing Waypoints Using Pick
Use the CLEAR key to clear any modes appearing in the
lower right of the display screen.
Press PICK, the cursor prompt will be seen on the lower
left of the display screen. (Refer to Figure 21)
Press the cursor arrow which best describes the direction
of the existing waypoint. The waypoint will be highlighted.
Press GO TO. A line will be seen in the graphics area
showing your temporary route. (Refer to Figure 23)
Pressing CLEAR will clear the leftmost mode. ROUTE will always be the rightmost mode, so you
may clear PICK or CURSOR, but retain the ROUTE mode. You can continue to chain together
several points in a temporary route, using either the cursor or PICK.
Press and hold the CLEAR key to discontinue a route.


