


A variety of standard marine antenna hardware is available at marine dealers, which fit the 1”-14
female mounting threads on the receiver. Fiberglass shaft extensions are helpful accessories for
attaining maximum performance from the NS 10 receiver, however, before purchasing an
extension make certain that the inside diameter is at least ½” if you plan to route the cable
through the extension mast.
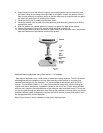
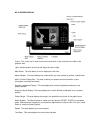
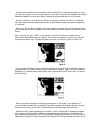
When choosing a location to mount the receiver, unobstructed visibility of the sky is essential for
best performance. The effective area of reception is only 7 degrees above the horizon (Refer to
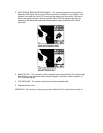
Figure 2). VHF or Loran antennas are not normally of sufficient size to cause a noticeable
degradation of signal quality, but larger antennas or portions of the boat’s superstructure will
seriously obstruct satellite visibility. Care should be used in selecting the mounting technique and
location since the receiver contains much of the electronics necessary to process the GPS
signals. Do not mount the receiver on top of a radar dome or within the transmitted radar beam.
Do not paint the exterior of the receiver housing, or use harsh chemicals to clean it, as these may
degrade performance.
CHOOSING A MOUNTING LOCATION FOR THE CONTROL HEAD
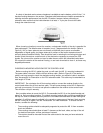
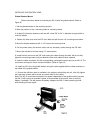
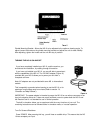
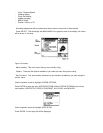
Before mounting the NS 10, gather the parts you will need: the NS 10, mounting hardware kit.
The power cable, hole cover, and the 40 foot receiver cable. (Refer to Figure 6). If the receiver
cable is not long enough to reach the desired mounting location, an extension cable is available.
See “Accessories” for information on the EC-6 extension cable. This cable may be extended to a
total length of 70 feet.
IMPORTANT: Do not shorten the 40 foot receiver cable or connect the receiver directly to the
control head without the 40 foot receiver cable. This will cause damage to the NS 10 electronics
and void your warranty. Do not cut and splice the cables from the receiver to the control head.
This will alsoo void your warranty.
Next, consider where to mount the NS 10. Pre-assemble the NS 10 on the gimbal bracket and
place it at likely mounting locations. The gimbal mounting bracket offers mounting capabilities for
the top of a shelf or bulkhead (and lets you tilt the unit forward and backward to ease viewing and
operation). If sufficient space is available in the console or gauge area of the boat, flush mounting
the NS 10 may be an option. See the “Accessories” for more information. To choose the best
location, consider the following:
- The mounting surface should be adequately supported to protect the NS 10 from excessive
shock and vibration.
- The mounting area should allow at least 2” clearance at the back, sides, and top of the unit
for electrical connection, air flow, and ease of removal.
- The receiver should be mounted first and the cable routed to the area you have selected to
mount the unit.