


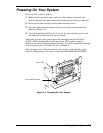


Configuring Your System 3-7
11. The View Current Settings screen is displayed. Press
Enter
to save the
current settings.
12. The Add confirmation screen is displayed. Review the manufacturer’s
comments and press
Enter
.
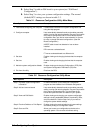
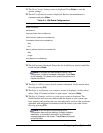
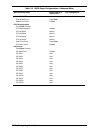
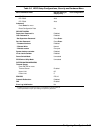
Table 3-4. ISA Board Configurations
ISA Board Definitions Your Configuration
Board Description:
Manufacturer:
Interrupts (Select from scrollable list)
DMA Channels (Select from scrollable list)
Port address (Select from scrollable list)
Start
End
Memory address (Select from scrollable list)
Start
Length
Slot
(Select from scrollable list)
13. The Add screen is displayed. Select the slot in which you want to install the
board and press
Enter
.
Note:
If the board you add causes a conflict in the
configuration, a Caution message is displayed. Press
Enter
at the message. This leads you to screens that allow you to
resolve the conflict.
14. The Step 2: Add or remove boards screen is displayed. At this screen select
Done by pressing
F10
.
15. The Steps in configuring your computer screen is displayed. At this screen
select “Step 4: Examine switches or print report” and press
Enter
.
16. The Step 4: Examine switches or print report screen is displayed. The
boards marked with an arrow indicate that the boards in your system may
have jumpers and switches that you must physically verify or that a software
statement with additional information about the board is provided. Select
Done by pressing
F10
.
Note:
If the ISA board you are adding to the
configuration does not have switches, jumpers, software
statements, or connection information, an Information
message appears on the screen. Press
Enter
and proceed
to the next step.