


Upgrading Your System 4-19
!
WARNING
If the system was running, any processor and heat sink installed is
hot. To avoid the possibility of a burn, let the components cool for 10
minutes before continuing with these procedures.
Installing a Processor Cartridge
Use the following procedure to install a processor cartridge.
Note:
All systems ship with a processor cartridge installed in the
bottom slot and termination boards in the remaining slots. Some
systems may have more processors, depending on configuration. All
processors must be matched in speed.
1.
Power off the system and remove the left side panel as described earlier.
2.
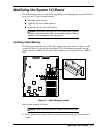
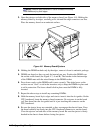
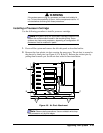
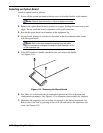
Remove the clear plastic air duct covering the processors. The air duct is secured to
the chassis by three pins (see Figure 4-9 A, B and C). Release the air duct pins by
pulling them towards you. Set the air duct aside for later installation.
A
VRM 1
B
C
VRM 2
VRM 3
VRM 4
VRM 6
VRM 5
PROC4
PROC3
PROC2
PROC1
Figure 4-9. Air Duct Attachment
Note:
Observe static precautions. Use an antistatic wrist strap.
Hold processors only by their edges.