


Page 102 CPV550
19.3.1 Receiving an All Ships Call
1. When an all ships call is received, an emergency alarm sounds.
2. The radio will automatically change to channel 16, and a
“RECEIVED DSC CALL” popup window will be shown on the
display to see the MMSI of the vessel transmitting the All Ships
Call.
3. Press any key to stop the alarm.
4. Monitor channel 16 or traffic channel until the URGENCY voice
communication is completed.
19.4 INDIVIDUAL CALL
This feature allows the CPV550 to contact another vessel with a DSC VHF radio and
automatically switch the receiving radio to a desired communications channel. This feature
is similar to calling a vessel on CH16 and requesting to go to another channel (switching
to the channel is private between the two stations).
19.4.0 Setting up the Individual / Position Call Directory
The CPV550 has a DSC directory that allows you to store a vessel or person’s name and
the MMSI number associated with vessels you wish to transmit Individual calls, Position
Requests and Position Send transmissions. The CPV550 can store up to 56 MMSI into the
Individual directory.
To transmit an Individual call you must program this directory with information of the persons
you wish to call, similar to a cellular phones telephone directory.
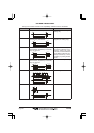
1. Select the chart page and press the [MENU] key two times. Move the ShuttlePoint knob
to highlight
RADIO SETUP and press [ENT] or move the ShuttlePoint knob to the right.
2. Move the ShuttlePoint knob to highlight
DSC SETTINGS and press [ENT] or move the
ShuttlePoint knob to the right.
3. Move the ShuttlePoint knob to highlight
INDIVIDUAL DIRECTORY and press [ENT] or
move the ShuttlePoint knob to the right.
4. Move the ShuttlePoint knob to highlight
NEW then press [ENT].
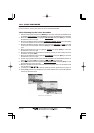
5. Move the ShuttlePoint knob to up or down to scroll through the first letter of the name
of the vessel or person you want to reference in the directory. You may enter the name
from the keypad. For example: press the [1] key repeatedly to toggle among the four
available characters associated with that key: AÆBÆCÆ1.
6. Move the ShuttlePoint knob to the right to store the first letter in the name and step to
the next letter to the right.
7. Repeat step 5 and 6 until the name is complete. The name can consist of up to eleven
characters.
8. After the eleventh letter or space has been entered, press [ENT] to advance to the MMSI
number entry.
9. Enter the MMSI number from the keypad. You may enter the MMSI number by moving
the ShuttlePoint knob. Move the ShuttlePoint knob to up or down to scroll through
numbers (0-9) and move the ShuttlePoint knob to the right to move one space to the
right.
10. If a mistake was made entering in the MMSI number move the ShuttlePoint knob to the
left until the wrong number is selected, then press the correct key or move the
ShuttlePoint knob to up or down to correct the entry.