


Airport Systems
SG-60 High Intensity Strobe System 5-2 Manual EPM-00000019 Rev A
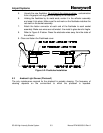
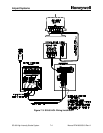
10. Attach wires with the push on connectors to the following terminals.
(a) White wire to the outer bottom right terminal
(b) Black wire to the terminal that matches the Controller input
voltage. (240v shown in Figure 5-1.)
11. You will need to replace the terminal lugs on the other 2 white wires
before attaching to the transformer.
(a) Cut off wire terminal lugs as close to lug as possible
(b) Strip insulation back and crimp on new push on connectors.
12. Attach White wires with new connectors to the upper back terminals
shown in diagram.
13. Re-install switch panel assembly to standoffs.
14. Visually inspect for loose connectors or any short-circuited lines.
15. Apply power to the Controller from the Circuit breaker.
16. Set Controller power switch to on and verify normal operation.
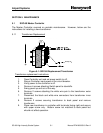
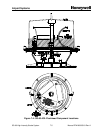
5.2 SGF-60 Flashhead
Normal maintenance of the Flashhead requires periodic cleaning of the window with a
non-abrasive soap.
WARNING!
Ensure that the power is off and the energy storage capacitors have
been discharged before opening the Flashhead. Do not put hands or
tools in the Flashhead until the High Voltage Indicator neon lamp DS1
on the High Voltage & Trigger board is extinguished. Refer to Figure
1-2, Page 1-3, for the location of High Voltage Indicator DS1 - do not
confuse the High Voltage Indicator DS1, with the PWR ON lamp DS1.
Note that it is possible for the High Voltage Indicator DS1 to be lit even
when the PWR ON lamp DS1 if off. If this happens, the energy storage
capacitors C1 - C3 must be discharged before performing maintenance.
5.2.1 Flashtube Replacement
Flashtubes that are faulty or degraded in performance by aging shall be replaced per
the following procedure:
1. Shut off the power to the system by opening the main AC power circuit
breakers.
2. Release the Flashhead cover latches.
3. Swing the cover open, exercising caution not to damage the glass face or the
gasket.
4. Release the old flashtube by disconnecting the electrode wire fastons at each
end and carefully snapping the flashtube from its holders.