


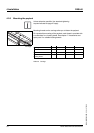

52 Portal axes with ball screw drive
4 Installation PAS4•S
MNA1MLSDM00EN, V2.01, 07.2009
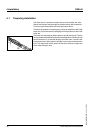
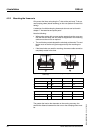
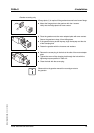
Mounting the elastomer coupling The elastomer coupling has two clamping hubs which may have differ-
ent holes.
̈ Slide the matching clamping hub onto the shaft extension of the lin-
ear axis all the way to the stop.
̈ Tighten the clamping screw at the clamping hub with the tightening
torque specified in Table 4.2.
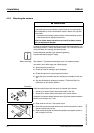
̈ Fit the elastomer spider onto the clamping hub.
Slightly greasing the ring gear or the hub facilitates the fitting proc-
ess. Use only mineral oil based lubricants without additives or sili-
con based lubricants.
NOTE: If the elastomer spider can be fitted too easily (without
preloading), it must be replaced.
̈ Mount the coupling housing with the 4 screws. Verify that the cou-
pling housing has even contact.
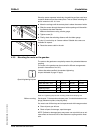
̈ Fit the second clamping hub.
Note the installation dimension d measured to the collar, as per
Table 4.2.
Check the orientation of the clamping screw (1), preferably
upwards. The clamping screw is tightened at a later point in time
through the hole in the motor adapter plate.
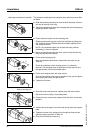
̈ Fit the motor adapter plate with even contact.
Verify correct position of the hole at the side so that you can tighten
the clamping hub screw through the hole.
̈ Tighten the 4 screws.
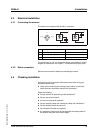
Motor mounting only
̈ Place the motor onto the motor adapter plate with even contact.
Secure the motor to keep it from falling down.
̈ Fasten the motor to the motor adapter plate with the 4 screws and
washers.
̈ Remove the screw plug in the hole at the side of the motor adapter
plate.
̈ Tighten the screw of the clamping hub through the hole with the
tightening torque specified in Table 4.2.
̈ Close the hole with the screw plug.
d
1