


105
Appendix E: Replacing the Hard Drive
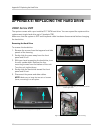
Replacing the Hard Drive
To replace the hard drive:
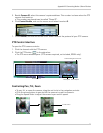
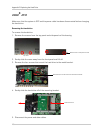
1. Firmly connect the power and data cables to the
replacement SATA hard drive—each cable can only
connect in one way.
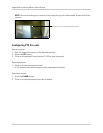
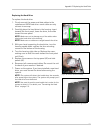
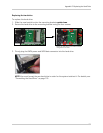
2. Carefully place the hard drive in the housing: insert
towards the front panel, lower the drive, then slide
toward the rear panel.
NOTE: Make sure not to damage any of the cables when
placing the hard drive in the housing.
NOTE: Make sure no cables are caught beneath the drive.
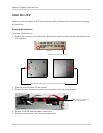
3. With your hand supporting the hard drive, turn the
housing upside down: replace the four mounting
screws on the bottom of the housing.
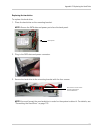
4. Turn the housing right side up. Replace the cover,
making sure to slide the cover toward the front panel
until flush.
5. Replace the screws on the top panel (x2) and side
panels (x2).
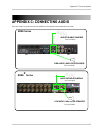
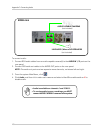
6. Reconnect all cameras and cables. Re-mount the unit
the back of your monitor if desired.
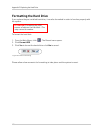
7. Power on the system. If you have installed a new hard
drive, you must format the drive before using the
system.
NOTE: The system will detect the hard drive a few seconds
after powering on the system. The system will prompt you if
the hard drive is not detected.
NOTE: You must format the new hard drive in order for the
system to detect it. For details,
see “Formatting the Hard
Drive” on page 110.
Figure 27.4 Connect the power and data cables.
Figure 27.5 Insert the drive carefully
Figure 27.6 Replace the mounting screws