


33
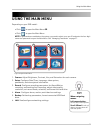
Using the Main Menu
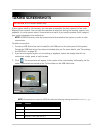
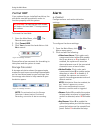
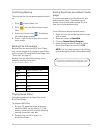
z Quality: Click under each camera
and select 1, 2, 3, 4, or 5.
z Audio: Click under each camera
and select either O to enable audio
or X to disable audio.
NOTE: Audio is only available on channels
1 and 2.
z Resolution: Click to set the
resolution for all cameras—
640x240 or 640x480.
To exit, right-click until you return to the main
screen.
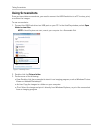
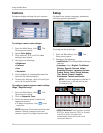
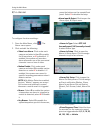
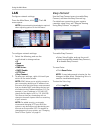
Schedule
4/8/16-channel
Set an hourly, daily, and/or weekly recording
schedule.
The Recording Schedule is a grid featuring the
days of the week and hours 0~23.
Active recording is known as
Working Hour
(yellow)
and non-recording is known as
Non-working Hour (green)
.
NOTE: As you make changes to the recording
parameters, the storage calculator at the
bottom of the menu displays the time remaining
on the hard drive.
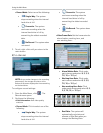
To set a recording schedule:
1. From the Record menu, click Schedule.
The Recording Schedule grid opens.
2. Click an hour square (0~23) in each weekly
row (Sun~Sat): active squares turn yellow,
inactive turn green.
3. To save your settings, right-click or until
you return to the main screen.
NOTE: Alarm or Motion Recording recording
will not be affected by the recording schedule.
Figure 12.6 Set image quality: 1 basic ~ 5 excellent
Figure 12.7 Recording Schedule
• Working Hour
• Non-working Hour