


77
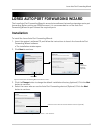
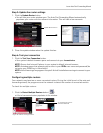
Lorex Auto Port Forwarding Wizard
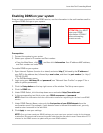
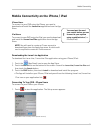
Enabling DDNS on your system
Once you have registered for free DDNS service, use the information in the confirmation email to
configure DDNS settings on your system.
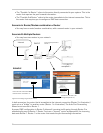
Prerequisites
1. Connect the system to your router.
2. Obtain your system’s IP number and Port number.
• From the Main Menu, click , and then click Information. Your IP address MAC address,
and Port number are under LAN.
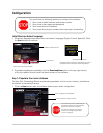
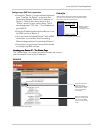
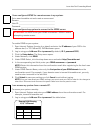
To enable DDNS on your system:
1. Open Internet Explorer (version 6 or above) and enter http://, followed by the IP address of
your DVR in the address bar, followed by a semi-colon, and then the port number (i.e. http://
192.168.2.5: 80)
• The DVR Netviewer opens.
2. Login using your LAN user ID and password (see “Network User Profiles” on page 47 for a
table of system passwords).
3. Click the Setup button on the top-right corner of the window. The Setup menu opens.
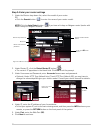
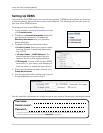
4. Click the DDNS tab.
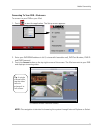
5. Under DDNS Select, click the drop-down menu and select http://lorexddns.net
6. In the corresponding text fields, enter your DDNS username and password.
NOTE: Obtain this information from the confirmation email after registering for the free Lorex DDNS
service.
7. Under DDNS Domain Name, enter only the first portion of your DDNS domain from the
confirmation email. For example, if your domain name is tomsmith.lorexddns.net, you only
need to enter
tomsmith
in the text field.
8. Click Apply to save your settings.
NOTE: Once you have saved your DDNS settings, you must reset your system in order for the changes
to take effect. Disconnect and reconnect the power cable from the rear panel to reset. Please allow 10~15
minutes for the DDNS servers to update with your new DDNS address.
Figure 29.0 DDNS setup in DVR Netviewer
ATTENTION: You
MUST
enter your DDNS
information
LOCALLY
before attempting
remote access.