


31
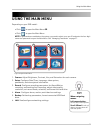
Using the Main Menu
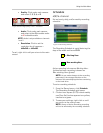
• Fan Speed: Click to set the fan speed to
Low, Middle, or High. The higher the fan
speed the cooler the HDD temperature (8/
16-channel
only
).
• Date/Time Setup: Click to open Date/Time
Setup. See “Setting the Date and Time” on
page 17.
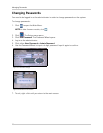
• DVR Password: Click to open the
password menu. See “Managing
Passwords” on page 27.
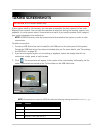
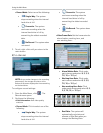
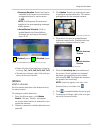
• Information: Click to view system
information: software, hardware, disk,
and LAN.
3. To save your settings, right-click until you
return to the main screen.
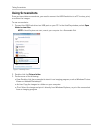
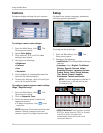
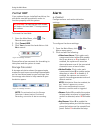
Record
Set recording parameters, image quality,
resolution, set the recording schedule, and
format the hard drive.
4-channel
NOTE: As you make changes to the recording
parameters, the storage calculator at the
bottom of the menu displays the time remaining
on the hard drive.
To configure record settings:
1. From the Main Menu, click . The
Record menu opens.
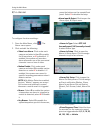
2. Configure the following:
• Alarm/Motion Rate: Click under each
camera and select X, 2, 3, 5, 7.5, 10, or
15 (fps).
• Working Hour Rate: Click under each
camera and select 0, 2, 3, 5, 7.5, 10, or
15 (fps).
• Non-working Hour Rate: Click under
each camera and select 0, 2, 3, 5, 7.5,
10, or 15 (fps).
• Quality: Click under each camera and
select 1, 2, 3, 4, or 5.
• Audio: Click under each camera and
select either O to enable audio or X to
disable audio.
NOTE: Audio is only available on
channels 1 and 2.
• Resolution: Click to set the resolution
for all cameras—640x240 or 640x480.
Figure 11.2 System information
Figure 12.0 Record menu
Figure 12.1 Frame rates for NTSC and PAL
Figure 12.2 Set image quality: 1 basic ~ 5 excellent
To enable motion recording
only, set the Working and Non
Working hour frame rates to 0.
Motion recording in the Alarm
menu must also be enabled.
TIP!