


54
Mail
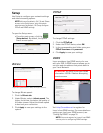
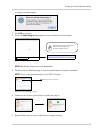
Configure email notification for triggered events on
your system.
NOTE: By default, Mail Notification is designed to
work with Lorex DDNS. You must first register with
Lorex DDNS for email notification to work. However,
you can also use your own SMTP server.
To configure email notification:
1. Under Send Mail Status, select Default.
2. In the From Your Email field, enter the
sender’s email address.
3. In the Interval drop-down menu, select
the duration the system will pause sending
notifications before sending out a new
e-mail alert.
4. In the Send To Email fields, enter the
recipient’s email address.
NOTE: You
must
enter a sender and recipient
email address for mail notification to work.
5.
Optional
: Enter a subject for the notification
and a location (of the DVR) in the respective
fields.
6. Click Apply to save your settings or click
Clear to exit without saving.
7. Click Test Email to send a test notification.
Click
OK to close the confirmation window.
NOTE: If you have made a mistake with either
email addresses, you will not receive the test
notification.
NOTE: If you want to use your own SMTP server,
select
ON from the Send Mail Status drop-down
menu. Enter the address of your SMTP Server,
port, user name, and password. Select the box
to log on using secure authentication. Enter the
sender’s email address and recipient’s email
address. Click
Apply to save your settings and
Test Mail to test the notification.
NOTE: 8/16 channel models send e-mail
notifications with a screen capture. 4 channel
models send text notifications only.
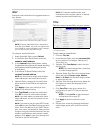
Title
Edit the camera names/titles on your system.
To edit camera names/titles:
1. Click the Title tab.
2. In the Channel fields, enter the new name/title
for the camera. For example,
Parking Lot 1
,
Front Door
, etc.
3.
Optional
: Click Font Option to select the font
and font style.
NOTE: You cannot change color, underline,
or strike through options.
4.
O
ptional
: Under Font Size, click the drop-down
menu and select X-Large, Large, Medium,
Small, or X-Small. You can also drag the slider
to adjust the font size.
5.
Optional
: Click the drop-down menu below the
font options to select the language for the
camera titles.
6. Click Save File to save your camera title
configuration to your PC. Files are saved as
MOV files.
NOTE: Click Load file to open the saved
configuration file on your PC.
7. Click Apply to save the new title to your
system.
8. Refresh your screen by changing the display
mode (single, quad, split-screen) to see the
titles.
Figure 23.6 Default email notification setup (8/16-channel
only)
Figure 23.7 Camera title setup (8/16-channel only—
16-channel shown)