


37
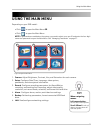
Using the Main Menu
• Response Duration: Select the time (in
seconds) for the system to record after
a triggered alarm or motion event:
1~255.
NOTE: The Response Duration also
applies to the accompanying message
and/or buzzer.
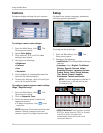
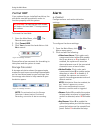
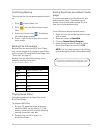
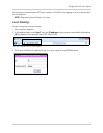
• Alarm/Motion Schedule: Click to
enable/disable the Alarm/Motion
Schedule for each day of the week/
hours 0-23.
• Select the size of the selection cursor by
clicking: 1x1 , 1x13, 3x5, 3x13, 5x9, 7x13
• To save your settings, right-click until you
return to the main screen.
Motion
4/8/16-channel
Set the motion detection cells and sensitivity
for each camera.
To configure motion detection:
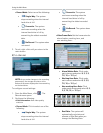
1. From the Alarm menu, click Motion
Enable. The text, "Motion" will appear
on-screen when motion is detected on the
respective camera.
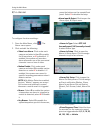
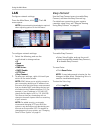
2. Choose a camera for motion detection and
select O.
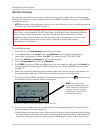
3. Click Motion. Select the camera you want
to configure motion detection. The motion
grid appears for the selected camera.
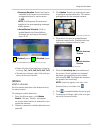
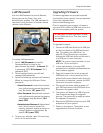
4. Click within the grid to enable/disable
individual motion cells. Enabled cells are
light green; disabled cells are clear.
5. Click the Sensitivity bar at the bottom of
the screen. Scroll up/down to increase/
decrease the sensitivity for the motion
cells from 0~100. The higher the number,
the greater the sensitivity.
NOTE: Sensitivity applies to all cells. If the
Sensitivity bar is not visible, click
.
6. Click to enable/disable the entire grid.
7. To save your settings, right-click until you
return to the main screen.
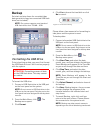
• Enabled (yellow)
•
Disabled (green)
Figure 13.5 Alarm/Motion Schedule (8/16-channel
only
)
Figure 13.6 Select the camera for motion detection (4-channel)
• Motion Detection
Disabled
Figure 13.7 Select cells and adjust sensitivity
• Motion Detection
Enabled