


Chapter 3 Installing and Configuring
26
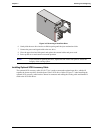
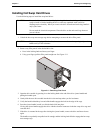
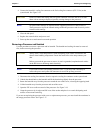
8. Hold the DIMM at 90 degrees to the system board and press the DIMM firmly and evenly into the slot
until the retaining latches close. See 3-15.
It is important to hold the DIMM firmly with both hands and use even pressure so as not to bend or
break the DIMM connector during installation. If the latches do not close, the DIMM is not inserted
correctly.
Figure 3-15. DIMM Insertion
9. Close the side panel.
10. Reconnect the power cord and all external cables.
11. Power up the server and return it to normal operation.
NOTE If the DIMMs are not seated properly you may get a blank screen.
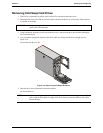
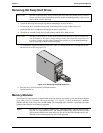
Removing DIMMs
You may need to remove a DIMM module to downsize your memory configuration or to replace a defective
DIMM.
Follow the steps in the preceding section, but instead of installing a DIMM, remove the DIMM.
NOTE If you power up the HP Server when there are no DIMMs installed, the screen displays an
error message or appears blank and sounds beep codes.
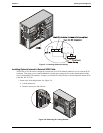
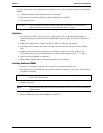
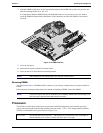
Processors
The HP Server tc3100 ships with at least one processor installed. Both primary and secondary processor
sockets are located on the system board (primary processor socket – CPU 1. The voltage regulator modules
(VRMs) are embedded in the system board. See Figure 3-16.
CAUTION Use an anti static service kit (3M
TM
8501/8502/8503 or equivalent). This kit includes a
static dissipating work surface, a chassis clip lead, and a wrist strap.