


the E-DDMs are powered up after the storage subsystem. For instructions
on powering up the storage subsystem, see the storage subsystem
documentation.
c. Turn on the power to the storage subsystem; then restart or turn on the
power to the host.
9. Turn on the power to each device, based on the power-on sequence in step 8
on page 158. To turn on power to the storage subsystem and the storage
expansion enclosures, turn on the power supply and fan unit switches on the
back of the storage subsystem. You must turn on both power supply and fan
unit switches to take advantage of the redundant power supplies.
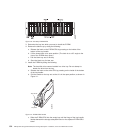
10. Check the green Drive activity LEDs and the amber Drive fault LEDs above
the new E-DDM CRUs.
Make sure that the Drive activity LEDs are on and the Drive fault LEDs are off.
Note: The Drive fault LEDs might flash intermittently while the E-DDMs spin
up.
v If the Drive activity LED is off, the E-DDM CRU might not be installed
correctly. Remove the E-DDM CRU, wait 30 seconds, and then reinstall it.
v If the Drive fault LED stays on or the Drive activity LED stays off, the new
E-DDM might be faulty. See the DS4000 Storage Manager software for
problem determination.
11. Use the DS4000 Storage Manager software to configure the new E-DDMs.
See the DS4000 Storage Manager software online Help for detailed
instructions.
12. Restore the data from backup to all the E-DDMs.
Replacing the E-DDMs one at a time
Use this procedure to replace all the E-DDMs one at a time. You cannot use this
procedure on RAID 0 logical drives (use the procedure in “Replacing all E-DDMs at
the same time” on page 157).
Note: If your storage subsystem has hot spares assigned, you might want to
unassign the hot spares while you perform this procedure. If you do not,
reconstruction might start on the hot spare before you insert the new
E-DDM. The data on the new E-DDM is still rebuilt, but the process takes
longer for each E-DDM. Remember to reassign the hot spares when you are
finished with this procedure.
Attention: After you remove an E-DDM CRU, wait 70 seconds before replacing or
reseating the E-DDM CRU to allow it to properly spin down. Failure to do so may
cause undesired events.
To replace the E-DDMs one at a time, perform the following steps:
1. Read the following information:
v “Replacing multiple E-DDMs” on page 156, particularly the paragraphs that
discuss the differences between the two possible upgrade procedures
v Your software documentation regarding E-DDM upgrades and installation
v The documentation that comes with the new E-DDMs
Read all precautionary notes, kit instructions, and other information. Kit
instructions often contain the most current information regarding the
E-DDMs and their installation, plus upgrade or servicing procedures.
Compare the kit instructions with this procedure to determine if you need to
modify this procedure.
Chapter 5. Replacing components 159