


2. Use the DS4000 Storage Manager software to check the status of the unit.
Correct any problems that are reported.
3. Back up the data in the arrays and logical drives that are configured using the
E-DDMs that you are replacing.
Attention: When you handle static-sensitive devices, take precautions to
avoid damage from static electricity. For details about handling static-sensitive
devices, see “Handling static-sensitive devices” on page 33.
4. Unpack the new E-DDMs.
Set the E-DDMs on a dry, level surface away from magnetic fields. Save the
packing material and documentation in case you need to return the E-DDMs.
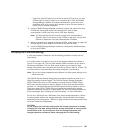
5. Use the DS4000 Storage Manager software to ensure that the array that was
defined using these E-DDMs is in optimal (not degraded) state before manually
failing the first E-DDM you want to replace. If the array is in degraded state,
use the recovery procedures to bring the array into the optimal state.
Make sure of the following:
v You fail only one E-DDM.
v The software status display shows a failed status for the appropriate
E-DDM.
v The amber Drive fault LED (on the front bezel below the E-DDM) is on.
Attention: Removing the wrong E-DDM can cause data loss. Make sure that
you remove only the failed E-DDM CRU. The Drive fault LED below the failed
E-DDM CRU should be on.
If you remove an active E-DDM accidentally, wait at least 30 seconds and then
reinstall it. Because you failed two E-DDMs in a RAID array, the array might be
marked failed by the controller. This array will not be available to the host for
I/O. See the DS4000 Storage Manager software for further recovery
instructions. Do not attempt to replace any E-DDMs until the array is brought
back to optimal state.
6. Use the procedures in “Replacing hot-swap E-DDMs” on page 155 to remove
the failed E-DDM. Use the procedures in “Installing hot-swap E-DDMs” on
page 153 to install the new E-DDMs into the storage subsystem.
The new E-DDM automatically reconstructs the data after you install it in the
drive slot.
During data reconstruction, the amber Drive fault LED might come on for a few
minutes, then turn off when the green Drive activity LED begins flashing. A
flashing Drive activity LED indicates that data reconstruction is in progress.
Note: If your storage subsystem has active hot spares, data might not start
copying to the new E-DDM until the data is reconstructed on the hot
spare. This increases the time that is required to complete the
procedure.
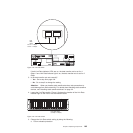
7. Check the green Drive activity LED and the amber Drive fault LED above the
new E-DDM CRUs.
Make sure that the Drive activity LEDs are on and the Drive fault LEDs are off.
Note: The Drive fault LEDs might flash intermittently while the E-DDMs spin
up.
v If the Drive activity LED is off, the E-DDM CRU might not be installed
correctly. Remove the E-DDM CRU, wait 30 seconds, and then reinstall it.
160 IBM System Storage DS4700 Express Storage Subsystem: Installation, User’s and Maintenance Guide