M440LX Server System Product Guide
99
4. Being careful not to touch the components or gold edge connectors on
the board, remove it from its protective wrapper and place it
component-side up on a nonconductive, antistatic surface.
5. Record the board serial number in your equipment log.
6. Set any jumpers or switches according to the board manufacturer's
instructions.
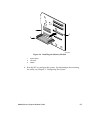
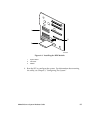
7. Hold the board by its top edge or upper corners, and firmly press it into
an expansion slot
on the system board (Figure 4-11 or Figure 4-12). The
tapered foot of the board retaining bracket must fit into the mating slot
in the expansion slot frame.
8. Align the rounded notch in the retaining bracket with the threaded hole
in the expansion slot frame. The retaining bracket fits into the space
that was occupied by the slot cover.
9. Insert the screw you removed earlier, and push the rounded notch up
against the screw. Tighten the screw firmly (6.0 inch-pounds) to
prevent the bracket from interfering with an adjacent one.
10. Replace the left side cover (page 81).
11. If you installed an ISA add-in board, run the SCU to reconfigure the
system. Running the SCU is optional for a PCI add-in board. For
information about running this utility, see Chapter 3, “Configuring The
System.”


