


Page 24 CPF180i and CPF300i
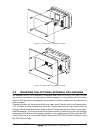
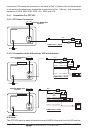
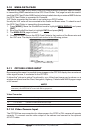
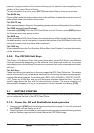
2.4.3.2 Connection a VideoCamera, AIS receiver, VHF and Autopilot
CPF300i
VIDEO
Camera
Battery
10-35Vdc
Red
2A
Fuse
Black
Switch
+
-
VHF
PILOT
Blue
Brown
Gray
Yellow
Port 1 Input
Port 1 Output
Port 2 Input
Port 3 Output
PWR & ACC 1 Cable
AIS
Transducer
Optional WAAS GPS
antenna
NOTE
The Input and Output baud rate for each port is set using the Advanced
Setup>In/Out Connections menu. For example if Port 1 is set for AIS 38400, the
Input and Output both operate at 38400 baud.
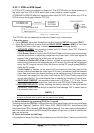
AIS Setup
The CPF300i has to be setup to be able to receive NMEA information from the AIS receiver.
1. Press [Menu], move the ShuttlePoint knob to highlight
SETUP MENU and press [ENT].
2. Move the ShuttlePoint knob to highlight
ADVANCED SETUP and press [ENT] or move
the ShuttlePoint knob to the right.
3. Move the ShuttlePoint knob to highlight
IN/OUT CONNECTIONS and press [ENT] or
move the ShuttlePoint knob to the right.
4. Move the ShuttlePoint knob to highlight
PORT 2 INPUT and press [ENT] or move the
ShuttlePoint knob to the right.
5. Move the ShuttlePoint knob up/down to select
AIS 38400 and press [ENT] or move the
ShuttlePoint knob to the right.
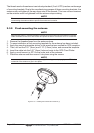
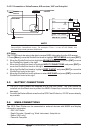
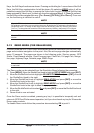
2.5 BATTERY CONNECTIONS
1. The GPS Chart Plotters are supplied with a fuse and holder. This fuse should be
installed into the Black wire to protect the NMEA Output/Input circuits from becoming
damaged.
2. Connect the Red and Black wires from the GPS Chart Plotter to a 12VDC source directly
as possible.
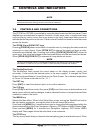
2.6 NMEA CONNECTIONS
The GPS Chart Plotter can be connected to external devices with NMEA and display
information, examples:
· DSC VHF Radio
· Depth Sounder, Speed Log, Wind Instrument, Autopilot etc.
· Radar (USA only)
· Personal Computer