


Page 84 CPF180i and CPF300i
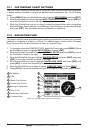
12.1 CUSTOMIZING CHART SETTINGS
The GPS Chart Plotter also allows you to customize items shown on the chart (discussed
in above sections) instead of using a pre-defined table discussed in Par. 12.0.5 Display
Mode.
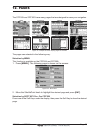
1. Press [MENU]. Move the ShuttlePoint knob to highlight
SETUP MENU and press [ENT].
2. Move the ShuttlePoint knob to highlight
MAP CONFIGURATIONS and press [ENT] or
move the ShuttlePoint knob to the right.
3. Move the ShuttlePoint knob up or down to select the desired item within the groups
Marine Settings, Depth Settings, Land Settings, Chart Settings or Underwater Settings
and press [ENT]. See the above sections for details on selections.
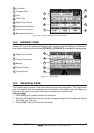
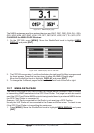
12.2 NAVIGATION PAGE
This page is useful to show information when heading to a destination, following a compassa
heading or navigating to a Mark or a Route. The default page is shown with a Compass
Rose, however this can be customized to show a Compass Tape.
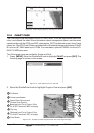
1. To change to show the COMPASS TAPE, select the Chart page, press [MENU]. Move
the ShuttlePoint knob to highlight SETUP MENU and press [ENT].
2. Move the ShuttlePoint knob to highlight
GENERAL SETUP and press [ENT] or move
the ShuttlePoint knob to the right.
3. Move the ShuttlePoint knob to highlight
WINDOW SETUP and press [ENT] and press
[ENT] or move the ShuttlePoint knob to the right.
4. Move the ShuttlePoint knob to highlight
NAVIGATION PAGE and press [ENT] and
press [ENT] or move the ShuttlePoint knob to the right.
5. Move the ShuttlePoint up or down to select
COMPASS TAPE and press [ENT].
6. Press [CLR] or move the ShuttlePoint knob to the right until the Chart page is shown.
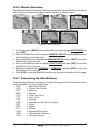
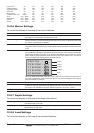
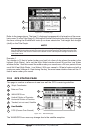
4
Fix position
2
Bearing to Destination
Time
1
3
Speed Over Ground
Course Over Ground
5
1
3
4
2
8
WAAS 3D
5
Time To Go
6
6
7
Distance to Destination
7
Compass Rose
8
Figure 12.2 - Navigation Data page with Compass Rose