


Page 96 CPF180i and CPF300i
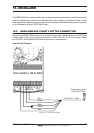
· Activation Range: Range around your boat where targets become active. AIS target
become active within this range. Activation Range should be greater than CPA Limit
by definition.
NOTE
A target is removed from the screen if data is not received for 10 minutes.
The maximum number of tracked targets is 100.
Depending on the scale the presentation of the targets change to remove clutter on the screen. This
information is updated every 3 seconds to 6 minutes depending on speed and rate of turn, enabling
the track of the vessels in range to be plotted.
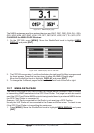
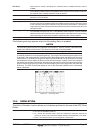
Figure 14.0 - AIS Symbols
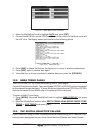
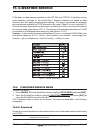
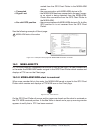
14.1 AIS MENU
To configure the GPS Chart Plotter to receive AIS data, follow the procedure:
1. Press [MENU]. Move the ShuttlePoint knob to highlight
SETUP MENU and press [ENT].
2. Move the ShuttlePoint knob to highlight
AIS SETUP and press [ENT] or move the
ShuttlePoint knob to the right. The new AIS menu appears on the screen. The available
functions are described in the following table.
Display : Turns the display of AIS Targets overlay on the cartography On or Off. The default setting is On.
Activation Range : Defines the range from the fix within which the AIS Target becomes active. The values allowed
are from 0.1 to 20 Nm. The default setting is 5 Nm.
CPA Alarm : Turns On or Off the alarm. The default setting is On.
CPA Limit : The values allowed are from 0.1 to 10 Nm. The default setting is 0.5 Nm.
TCPA Alarm : Turns On or Off the alarm. The default setting is On.
TCPA Limit : The values allowed are from 1 to 30 Min. The default setting is 10 Min.
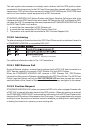
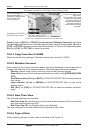
14.2 TO SET THE CHART PLOTTER FOR RECEIVING AIS
Make sure that the AIS receiver is properly connected to the GPS Chart Plotter (refer to Par.
2.4). The GPS Chart Plotter reads the AIS NMEA message VMD, type 1, 2, 3 and 5. Select
the used serial port and transmission speed by following the procedure:
1. Press [MENU]. Move the ShuttlePoint knob to highlight
SETUP MENU and press [ENT].
2. Move the ShuttlePoint knob to highlight
ADVANCED SETUP and press [ENT] or move
the ShuttlePoint knob to the right.
3. Move the ShuttlePoint knob to highlight
IN/OUT CONNECTIONS and press [ENT] or
move the ShuttlePoint knob to the right.
4. Move the ShuttlePoint knob to highlight
PORT n and press [ENT] or move the
ShuttlePoint knob to the right.
5. Move the ShuttlePoint knob to highlight
AIS 38400 and press [ENT] or move the
ShuttlePoint knob to the right.