


Chapter 6 Managing the File System
Working With Disks
StorNext User’s Guide 112
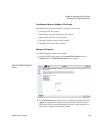
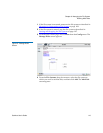
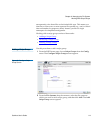
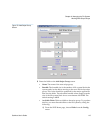
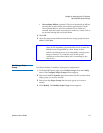
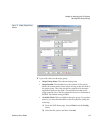
1 From the SNFS home page, choose Disks from the Config menu. The
Manage Disks screen (figure 67
) appears.
2 Select from the File Systems drop-down menu the file system that
contains the disk you want to delete.
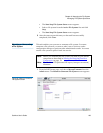
3 Select from the Disks list the disk you want to delete.
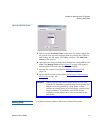
4 Click Delete. A message asks you to confirm that you want to delete
the disk.
5 Click OK to proceed with the deletion. The Delete Disk status screen
appears.
6 After the status screen indicates that the disk has been deleted, click
Close.
Defragmenting a Disk 6
This procedure describes how to defragment a disk using the
snfsdefrag utility to relocate SNFS file data into a single, pre-allocated
extent. Reducing the number of extents in a file improves system
performance by minimizing disk head movement when I/O occurs. You
can defragment a single file or multiple files, perform a recursive
defragment on files in a directory, or defragment the entire file system.
1 Log onto a metadata controller as root. The metadata controller is the
computer where the StorNext server (not the client) is installed.
2 Do one of the following:
• To defragment a single file or a list of files, type:
/usr/cvfs/bin/snfsdefrag <filename> [filename ....]
• To perform a recursive defragment on files in a directory, type:
/usr/cvfs/bin/snfsdefrag -r <directory_name>
If the directory_name value is equal to the mount point, then the
entire StorNext file system is defragmented.
Caution: Deleting a disk used in a stripe group results in a complete
loss of user data and requires re-making the file system.
For information on re-making the file system, refer to
Making or Unmaking a File System
on page 105.