


Note: When creating the rst VRM/EBL, it will be placed at a
location of 1/3 of the current range and 030° relative to your
boat’s head. If this setting is adjusted, the display will retain the
adjustments and use them when the VRM/EBL is next enabled.
Unoating a VRM or EBL on the radar display
1. In the Radar application, press the VRM/EBL softkey.
2. Press the FLOATING softkey (VRM/EBL must be switched ON).
3. Press the CENTER softkey.
4. Press the OK button.
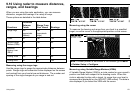
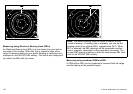
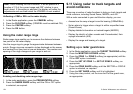
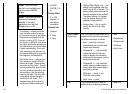
Using the radar range rings
Radar range rings enable you to measure the distance between
two points on the radar display.
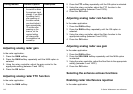
Use the range rings to gauge the approximate distances between
points. Range rings are concentric circles displayed on the screen
and centred from your boat at pre-set distances. The number and
spacing of the rings changes as you range in and out.
Range -
1
/
4
nm
Range rings -
1
/
8
nm apart
Range -
3
/
4
nm
Range rings -
1
/
4
nm apart
Range - 1
1
/
2
nm
Range rings -
1
/
4
nm apart
D8407_1
e.g.
Enabling and disabling radar range rings
1. In the radar application, press the PRESENTATION softkey.
2. Press the RANGE RINGS softkey until the ON or OFF option
is selected, as required.
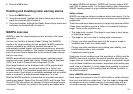
9.11 Using radar to track targets and
avoid collisions
There are a number of radar functions to help you track targets and
avoid collisions, including Guard Zones, MARPA, and AIS.
With a radar connected to your multifunction display, you can:
• Assess how far away a target is and its bearing (VRMs/EBLs).
• Set an alarm to trigger when a target is within a specied zone
(Guard Zones).
• Display detailed information on tracked targets (MARPA).
• Display the identity of other vessels and if broadcasted, their
voyage information (AIS).
• Display the range and bearing of a target.
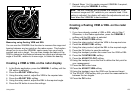
Setting up a radar guard zone
1. In the Radar application, press the TARGET TRACKING softkey.
2. Press the MONITOR IN ZONES softkey.
3. Press the ZONE 1 or ZONE 2 softkey (as appropriate) until the
ON or OFF option is selected.
4. Press the SET UP ZONE 1 or SET UP ZONE 2 softkey, as
appropriate.
5. Press the ZONE SHAPE softkey until the SECTOR or CIRCLE
option is selected, as required.
6. Press the SET INNER softkey until it is highlighted.
7. Using the rotary control, set the inner limit for the guard zone,
as appropriate.
124
C-Series Widescreen user reference