


Reference Manual
00809-0100-4021, Rev DA
November 2004
3-17
Rosemount 3144P
HART
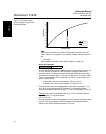
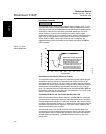
Example: The high alarm value has been set to 20.8 mA. Therefore, the low
saturation level, S, must be as follows:
20.5 ≤ S ≤ 20.7 mA.
Preset alarms can either be 1 Rosemount or 2 NAMUR-compliant. Use the
failure mode switch on the front side of the electronics (see “Switch Location”
on page A-7) to set whether the output will be driven to high or low alarm in
the case of failure.
AMS
For AMS, configure each sensor as indicated above.
Right click on the device and select “Configuration Properties” from the
menu. Select the Analog Output tab to define the alarm and saturation
levels. From the Alarm box, enter the low and high alarm and the low and
high saturation.
Apply changes made (see “Apply AMS Changes” on page 3-5).
To preset to Rosemount standard or NAMUR NE43 compliant levels:
Right-click on the device and select “Configuration.” Select “Alarm
Configuration” then select “Alarm Configuration” then “Preset alarm
levels.” The wizard will walk through the configuration.
HART Output
The HART Output command allows the user to make changes to the
multidrop address, initiate burst mode, or make changes to the burst options.
AMS
Right click on the device and select “Configuration Properties” from the
menu. Select the HART tab to configure for multidrop and Burst Mode.
Apply changes made (see “Apply AMS Changes” on page 3-5).
LCD Display Options
The LCD Display Option command sets the meter options, including
engineering units and decimal point. Change the LCD display settings to
reflect necessary configuration parameters when adding a LCD display or
reconfiguring the transmitter. Transmitters without LCD displays are shipped
with the meter configuration set to “Not Used.”
To customize variables that the LCD display displays, follow the steps below:
1. From the home screen select 1 Device Setup, 3 Configuration, 4Dev
Output Config, 4 LCD Display Options, and 1 Meter Config.
2. Select the appropriate variable configuration from the Meter
Configuration screen.
3. Press F4, ENTER, and then F2, SEND, to send the information to the
transmitter. The LCD display will scroll through the outputs selected in
step 2.
To change the decimal point configuration, perform the following steps:
1. From the home screen select 1 Device Setup, 3 Configuration, 4Dev
Output Config, 4 LCD Display Options, and 2 Meter Decimal Pt.
HART Fast Keys 1, 3, 4, 3
HART Fast Keys 1, 3, 4, 4