


Chapter 3 Operation
3 - 9
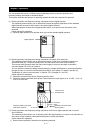
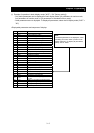
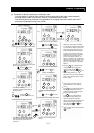
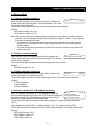
(4) Procedure for directly specifying or selecting a code
- You can specify or select a code or data by entering each digit of the code or data instead of
scrolling codes or data in the monitor, function, or extended function mode.
- The following shows an example of the procedure for changing the monitor mode code "d001"
displayed to extended function code "A029":
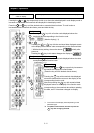
("A029" is displayed.)
FUNC STR
RUN
STOP/
RESET
FUNC STR
RUN
STOP/
RESET
FUNC
RUN
STOP/
RESET
FUNC STR
RUN
STOP/
RESET
STR
FUNC
RUN
STOP/
RESET
STR
FUNC STR
RUN
STOP/
RESET
FUNC
RUN
STOP/
RESET
STR
FUNC STR
RUN
STOP/
RESET
FUNC STR
RUN
STOP/
RESET
FUNC
STR
FUNC
FUNC
STR
FUNC
(*2)
(*3)
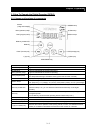
2) Change to the extended function mode.
Press the and keys
to
g
ether.
(
*1
)
1
- Character "d" in the leftmost digit (fourth digit
from the right) starts blinking.
2
Press the key twice.
2
("A001" is displayed.)
(*3)
- Character "A" is blinking.
- Pressing the [STR] key determines the
blinking character.
(*2)
Press the key
(to determine character "A").
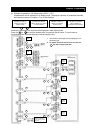
3) Change the third digit of the code.
- Character "0" in the third digit is blinking.
- Since the third digit need not be changed,
press the [STR] key to determine the
character "0".
- Character "0" in the second digit is
blinking.
Press the
key.
(Character "0" is
determined.)
(*2)
4) Change the second digit of the code.
Press the key twice.
1
- Character "2" in the second digit is
blinking.
(*2)
(*2)
- Character "1" in the first digit is blinking.
STR
Press the key.
("A021" is displayed.)
5) Change the first digit of the code.
- Character "9" in the first digit is blinking.
Press the key eight
times or the ke
y
twice.
1
2
(*2)
STR
Press the
key.
(Character "9"
is determined.)
- Selection of code "A029" is completed.
* If a code that is not defined in the code list
or not intended for display is entered, the
leftmost digit (fourth digit) (character "A"
in this example) will start blinking again.
In such a case, confirm the code to be
entered and enter it correctly. For further
information, refer to Section 4.2.80. "
Function code display restriction," (on
page 4-74), Section 4.2.81, "Initial-screen
selection," (on page 4-76), Section 4.2.82,
"Automatic user-parameter setting," (on
page 4-77), and Chapter 8, "List of Data
Settings."
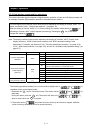
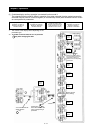
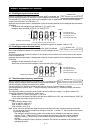
7) Press the key to display the data
corresponding to the function code,
change the data with the and/or
key, and then press the key to
store the changed data. (*4)
Note that you can also use the procedure
(steps 1) to 6)) described here to change
the data. (*3)(*4)
*1
This procedure can also be used on
screens displaying a code other than
"d001".
*2
If the key is pressed while a digit is
blinking, the display will revert to the
preceding status for entering the digit to
the right of the blinking digit.
*3
If the key is pressed while the
leftmost (fourth) digit is blinking, the
characters having been entered to
change the code will be cancelled and the
display will revert to the original code
shown before the and keys
were pressed in step 1).
*4
When changing data, be sure to press the
key first.
FUNC
1
2
FUNC
FUNC
FUNC
1 2
STR
("d001" is displayed.)
1) Display the monitor mode code. 6) End the change of the extended function code.