


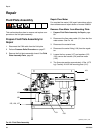
Repair
82 3A2098H
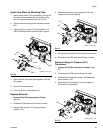
5. Secure the new V/P transducer to the bracket with
screws.
6. Reconnect the FCM cable and both air tubes.
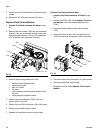
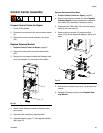
Replace Fluid Control Module
1. Prepare Fluid Plate Assembly for Repair, page
80.
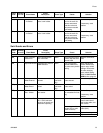
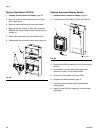
2. Remove the four screws (128) from the transducer
bracket (118), and remove the bracket. (Leave the
dispense valve solenoid (132) and V/P transducer
(121) attached to the transducer bracket.)
3. Remove the following cables from FCM:
• dispense valve solenoid cable
• meter sensor cable
• both V/P cables
• I/O cable
• inlet pressure transducer cable (ambient mod-
els only)
• outlet pressure transducer cable
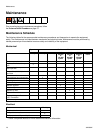
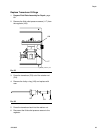
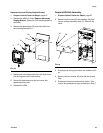
4. Remove the two screws from FCM (103) and
replace with a new FCM.
5. Secure the new FCM to the base (102) with screws.
6. Reconnect the cables listed in step 3.
7. Reattach the transducer bracket using screws.
Replace Fluid Control Module Base
1. Prepare Fluid Plate Assembly for Repair, page
80.
2. Remove the FCM (103); follow Replace Fluid Con-
trol Module. (Leave the cables attached to the
FCM.)
3. Remove the power supply cable from the base
(102).
4. Remove the four screws (105) and ground screw
(106) from the base and replace it with a new base.
5. Secure the base to the fluid plate (101) with screws.
6. Reconnect the power supply cable.
7. Reattach the FCM; follow Replace Fluid Control
Module.
F
IG
. 53
128
121
118
132
r_pf0000_313377_30a
102
103
F
IG
. 54
106
105
103
102