


Repair
84 3A2098H
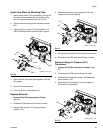
Repair Fluid Regulator
For complete cartridge fluid regulator repair refer to
instruction manual 308647. For complete mastic fluid
regulator repair refer to instruction manual 307517.
See F
IG
. 57 and perform the following steps.
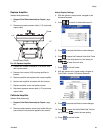
1. Prepare Fluid Plate Assembly for Repair,
page 80.
2. Remove the cartridge assembly by loosening the
valve housing (CE) with a 6 mm hex wrench and
pulling the cartridge assembly out of the base hous-
ing (CD).
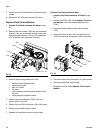
NOTE: The retaining nut (CC) often loosens when
removing the cartridge assembly from the base housing.
Be sure to re-torque as described in step 4.
3. Inspect and clean the internal walls of the base
housing (CD).
NOTE: Be careful to not scrape or gouge the internal
walls of the base housing. They are a sealing surface.
4. Re-torque the retaining nut (CC) to 140-160 in-lb
(16-18 N•m).
NOTE: You must re-torque the retaining nut before you
install it in the base housing during step 5.
5. Install the new cartridge assembly in the base hous-
ing (CD), and torque the valve housing (CE) to
30-35 ft-lb (41-48 N•m).
NOTE: The valve seat is double sided and may be
reversed for extended life. The o-ring and ball must be
replaced. See instruction manual 308647.
NOTICE
Carefully handle the hard carbide ball, valve actua-
tor, and valve seat to avoid damaging them.
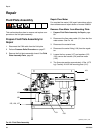
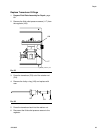
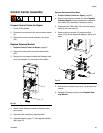
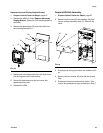
F
IG
. 57: Replace Cartridge Assembly
diaphragm
and valve
actuator
subassembly
cartridge
assembly
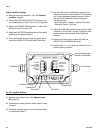
Torque Sequence for Regulator
Base Housing Screws (CF)
4
2
3
1
CD
CE
CC
Cartridge Regulator 244734 Shown
CF