


e-STUDIO3511/4511 PREVENTIVE MAINTENANCE 4 - 18 November 2003 © TOSHIBA TEC
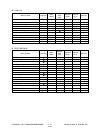
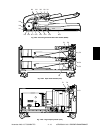
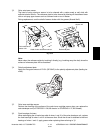
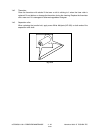
Outside
Inside
Developer frame
(Nozzle mixer)
Grease
Oil seal
Fig. 4-211
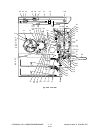
*f1. Main charger case / Main charger wire
Clean the main charger case and wire with a cloth soaked in water and squeezed tightly, and
then wipe them with a dry cloth.
Note:
Be careful of the following when attaching a new wire (length: 373 mm).
• Insert the wire securely into the V-grooves of the front and rear sides.
• Do not twist the wire.
• Do not touch the wire with your bare hand.
*g1. Drum cleaning blade / Drum cleaner brush
Since the edge of the blade is vulnerable and can be easily damaged by factors such as the
adherence of paper dust. Replace the cleaning blade and brush with new ones if poor images
are copied due to the damaged blade regardless of the number of output pages which have
been made.
*g2. Recovery blade
Replace the recovery blade regardless the number of output pages if the edge of the blade get
damaged.
*i1, j1. Developer material
After replacing the developer material, be sure to perform the auto-toner adjustment and then
image quality control initialization ( Chapter 3.2 ).
*i2. Oil seal (Black developer unit)
Mixer unit (Shafts of mixers-1 & -2) 4 pcs.
Developer sleeve 2 pc.
*j2. Oil seal (Color developer unit)
Mixer unit (Rear side of mixers-1 & -2) 2 pcs.
Developer sleeve 2 pc.
Note:
1. Lubricate the oil seal only when the oil seal is replaced.
2. When exchanging the oil seal of the color developer unit, replace “j6. Front bearings of
mixers” at the same time.
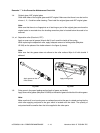
During replacement, coat the oil seal with grease (Alvania No.2).
(1) Push in a new oil seal parallel to the mounting hole
section of the developer frame or outside of the nozzle
mixer.
* Pay attention to the direction in which the oil seal is
attached. (See figure on right.)
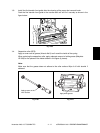
(2) Apply an even coat of grease to the inside of the oil
seal.
• Amount: About two small drops
(3) Wipe off any grease exuded from the inside.
05/03