


e-STUDIO3511/4511 TROUBLESHOOTING 5 - 70 November 2003 © TOSHIBA TEC
5.1.17 Image control related service call
(1) Based on the procedure of [CE10], [CE20] and [CE40] described below, check the status and take
appropriate actions. And then perform the forced performing of image quality closed-loop control
according to the following procedure.
1. While pressing [0] and [5] simultaneously, turn ON the power.
2. Key in [395], and then press the [START] button. Confirm that the image quality control has
finished normally.
(2) After confirming the items in (1), clear the abnormal detection counter of image quality control.
1. While pressing [0] and [8] simultaneously, turn ON the power.
2. Key in [573], and then press the [START] button.
3. Rewrite the displayed status counter from "1" - "16" to "0", and then press the [ENTER] or
[INTERRUPT] button.
4. Key in [574], and then press the [START] button.
5. Rewrite the displayed status counter from "1" - "16" to "0", and then press the [ENTER] or
[INTERRUPT] button.
6. Key in [575], and then press the [START] button.
7. Rewrite the displayed status counter from "1" - "16" to "0", and then press the [ENTER] or
[INTERRUPT] button.
8. Key in [576], and then press the [START] button.
9. Rewrite the displayed status counter from "1" - "16" to "0", and then press the [ENTER] or
[INTERRUPT] button.
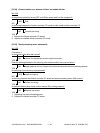
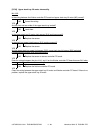
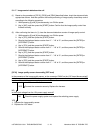
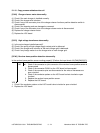
[CE10] Image quality sensor abnormality (OFF level)
Is the connector of the image quality sensor, or the connector CN345 on the LGC board disconnected?
Is the harness between the LGC board and the image quality sensor, or the harness between the LGC
board and the switching power supply open circuited?
YES Connect the connector securely. Replace the harness.
NO
Is the output voltage from the 12V-power supply normal?
NO Check the power supply system and replace the switching power supply.
YES
1. Replace the image quality sensor.
2. Replace the LGC board.