


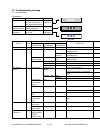


e-STUDIO3511/4511 TROUBLESHOOTING 5 - 104 November 2003 © TOSHIBA TEC
Correction method 2
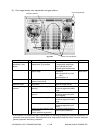
(1) While pressing the digital keys [0] and [5] simultaneously, turn the power ON. → (Adjustment Mode)
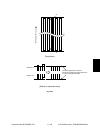
(2) Print out the test pattern and correct the deviation amount of the 1st page. Use the image position
of magenta (M) as a reference for correction. The image positions of yellow (Y), cyan (C) and black
(K) must be corrected with this reference.
a. Select A3/LD size. Key in "64" and then press the [FAX] button. → 2 pages of the test pattern
are printed out.
b. Check the image of the 1st page and specify the color to be corrected.
c. Key in the code "417" and press the [START] button.
d. Key in the sub code of the color to be corrected and press the [START] button.
Sub code 0: Black (K) 1: Cyan (C) 3: Yellow (Y)
e. Key in the adjustment value and press the [ENTER] or [INTERRUPT] button.
Notes:
1. When the value increases by "1", the image shifts toward the trailing edge of the paper by
0.0423 mm.
2. Adjust the image positions of black (K), cyan (C) and yellow (Y) so that the colors do not
overlap.
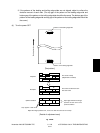
3. If the patterns of the leading and trailing edge sides are not aligned, adjust to uniform the
deviation amount of each side. (The top gap of the pattern on the leading edge side and
bottom gap of the pattern on the trailing edge side should be the same. The bottom gap of the
pattern on the leading edge side and top gap of the pattern on the trailing edge side should be
the same.)
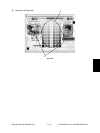
(3) Print out the test pattern and correct the deviation amount of the 2nd page. Use the image position
of magenta (M) as a reference for correction. The image positions of yellow (Y), cyan (C) and black
(K) must be corrected with this reference.
a. Select A3/LD size. Key in "64" and then press the [FAX] button. → 2 pages of the test pattern
are printed out.
b. Check the image of the 2nd page and specify the color to be corrected.
c. Key in the code "418" and press the [START] button.
d. Key in the sub code of the color to be corrected and press the [START] button.
Sub code 0: Black (K) 1: Cyan (C) 3: Yellow (Y)
e. Key in the adjustment value and press the [ENTER] or [INTERRUPT] button.
Notes:
1. When the value increases by "1", the image shifts toward the trailing edge of the paper by
0.0423 mm.
2. Adjust the image positions of black (K), cyan (C) and yellow (Y) so that the colors do not
overlap.
04/10