


Corrective Maintenance
Maintenance
6Ć20
WARNING
The cathode ray tube (CRT) may retain a dangerous electrical
(16 kV) charge. To prevent electric shock, fully discharge the anode
before removing the CRT. Short the anode lead from the CRT to the
chassis. Wait approximately ten minutes and again firmly short the
anode lead to the chassis. Then, remove the CRT.
If the CRT breaks, the glass fragments scatter at a high velocity
(implosion). Use extreme care when handling the CRT. Protective
clothing and safety glasses should be worn. Avoid striking the CRT
on any object which might cause it to crack or implode. When
storing a CRT, place it in a protective carton or set the CRT face
down in a protected location with a smooth surface and with the
CRT faceplate on a soft mat.
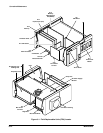
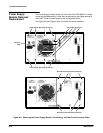
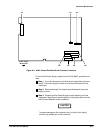
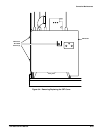
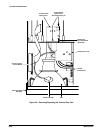
See Figures 6Ć1, 6Ć4, 6Ć5, 6Ć6, 6Ć7, 6Ć13, and 6Ć32 for module, connector,
screw, and index locations.
Remove the CRT as follows:
ăStep 1:ăRemove the three Torx head screws that secure the CRT cover,
and then the CRT cover.
ăStep 2:ăSet the instrument in the inverted position.
ăStep 3:ăUse a 1/16Ćinch Allen wrench to loosen the two small screws
that secure the two control knobs. Carefully remove the control knobs
so that you do not lose the small Allen screws inside the knobs.
CAUTION
When replacing the two control knobs, do not overtighten the two
Allen screws.
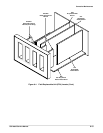
ăStep 4:ăRemove the two Torx head screws on the bottom of the A9
Touch Panel Assembly.
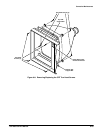
ăStep 5:ăLift up on the bottom of the A9 Touch Panel Assembly and
swing the assembly outward. The top of the A9 Touch Panel Assembly is
held in place with two tabs that hook under the top of the chassis. Pull
the assembly out until you can access the black ground wire that conĆ
nects the A9 Touch Panel Assembly to the instrument chassis.
ăStep 6:ăRemove the quickĆdisconnect ground connector that connects
the black ground wire to the instrument chassis.
Cathode Ray Tube
(CRT) Removal/
Replacement