


9-36 Issue 1 September 1995
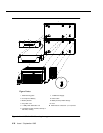
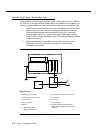
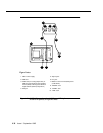
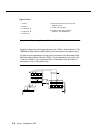
Description of the MSP-1 Power Supply
The MSP-1 (WP92464L1) Power Supply can be used to supply local power to
Attendant Console 302B, Integrated Services Digital Network (ISDN) -T 75xx,
and 85xx series telephones connected to an AT&T DEFINITY Communications
System and to telephones needing auxiliary power for their vacuum fluorescent
display. The MSP-1 can also supply auxiliary power to adjunct equipment such
as the S201A and CS201A speaker phones or a 500A Headset Adapter
attached to any currently manufactured analog, digital communications
protocol, or Integrated Services Digital Network (ISDN)-T telephone equipped
with an Adjunct jack.
!
CAUTION:
The MSP-1 Power Supply can be used only with telecommunications
equipment, indoors, and in a controlled environment.
The MSP-1 Power Supply has a single output of -48VDC, 0.4 amperes, and can
operate from either a 120 VAC 60 Hz Power source (105 to 129 VAC) or a 230
VAC 50 Hz Power source (198 to 264 VAC). Input voltage selection is automatic;
that is, the power supply adjusts itself for the type of input voltage. The output
capacity is 19.2 watts.
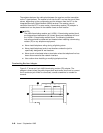
Locate the MSP-1 Power Supply
You may set the MSP-1 power supply on a flat surface such as a desk. Adhesive
fastener strips are packed with the MSP-1. These are used to mount it on a
vertical surface such as a wall.
!
CAUTION:
Do not locate the MSP-1 within six inches of the floor. Experience has
proven that the MSP-1 will not survive the hazards of locating it near the
floor.
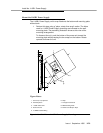
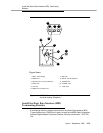
Mount the MSP-1 Power Supply
The double-sided adhesive fastener strip allows you to mount the power supply
on a flat vertical surface, such as on the wall or on the side of the desk.
Use the following procedure to mount the power supply near the telephone.
1. Locate a clean flat vertical surface on which to mount the power supply.
2. Peel the paper backing from one of the adhesive strips.
3. Firmly press the strip to the mounting surface. The fastener side of the
strip should be directed outward.
4. Peel the paper backing from the remaining adhesive strip.